1. Getting Started
You will find the Customer Search application on the SalesPad toolbar on the Application tab. The icon is shown here below. Click it to open the Customer Search tab.

2. 'Search by' Optional Fields
You find customers by entering values in the Search By section found at the top of the Custom Search screen, as shown below.

To find a customer you should start by searching in the first Customer field with the option ‘Is Like’ selected.
The ‘Is Like’ option will allow you to see close matches or matches that contain what you’re searching for.
The Customer field will automatically search all Names, Addresses, Phone Numbers, Contact Names, or email addresses that match the values you enter. If you want to get very specific, you can use one of the other fields to drill down but generally speaking the Customer field is all you really need for searching. The other operator options are:
Equals – will only return results that exactly match what you’ve put in.
Begins With – will only return results that start with what you put in.
Is Greater Than, Less Than, Or Equal To - will return results that do as suggested but have limited use in customer searches.
3. Search Results
Search Results will be displayed at the bottom of the Customer Search screen. You can sort the result by any header just by clicking it. Click once to sort the data by a particular header in ascending order and click it again to switch to descending order. You can tell when the results are sorted by a column and which direction when you see an arrow in the column header, as shown below.

This shows that the results are sorted by Customer Name in ascending order. You can also filter by any of the result values. First right click the column header and then on the menu choose ‘Show Auto Filter Row’, as shown here.

Now you can add text to the box below the column header to further filter your results, like this:

4. Showing Inactive Customers
To Show Inactive customers in your search results, you will need to navigate to the Search Options on the Customer Search page.

5. Add New Customers
New customers can be added from the customer search screen by clicking the new button located on the customer search toolbar, as shown below.

The new customer dialog box, shown below, represents all the fields needed to properly create a new customer. Fields that are greyed out are automatically populated based on what is needed. While all the information, except for Alt. Comp. Name – which is for an optional DBA, is expected, and needed to complete an order, only (highlighted in yellow below), Name and City are required to create a customer record.
 Sort Code is needed for accounting. The values should be set as follows:
• WN for Nursery Customers
• WA – DC Avon Customers• WB – DC Broadview Customers• WC – DC Hilliard CustomersTax Schedule needs verified. Be sure that the tax schedule is set correctly for the customer. In general, SalesPad will set the Tax Schedule based on which store is adding the customer. Avon will show Avon, Broadview will be BH, Hilliard will be Franklin. The nursery has historically used Ohio Sales but for consistency should switch to Avon. If your customer needs to be marked tax exempt, you will need to change that in the Tax Schedule (highlighted in purple) drop down manually. If you have the Tax ID (Registration Number) you can add that as well in the appropriate box.
As different users have different access, you may find that you're unable to change some fields that other users are able to change; this is by design.
By default, SalesPad will add both a PRIMARY and SHIPTO address entry as shown here.

Note: Customer Cards cannot be edited after they are created. If there are changes that need to be made, please reach out to Accounts Receivable.
6. Adding Additional Addresses to an Existing Customer
If you need to add additional contact addresses or shipping addresses, you will do that from the Customer Card. Use the customer search methods discussed in Section 3. Finding Customers document, use the ‘Contact Address’ tab shown below, and click ‘New’ to create a new contact address.

Each new shipping address must be given a code that starts with “SHIP-“ and ends with at least the first 4 characters of the new addresses city.
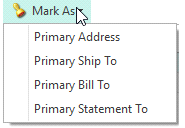
In Salespad orders allow us to differentiate between shipping email and billing email. Billing emails always use the email associated with the PRIMARY BILL TO address. This is usually the address that is put first, but if it needs to be changed you would do that on the Customer Card in Salespad using the Contact Address tab, and the Mask As button, shown here:
7. Changing Shipping Addresses on a Quote, Order, or Invoice
If you find that you need to change the shipping address for any reason, you will click the ‘Addresses’ tab on the Order Detail Menu. Then in the ‘Ship To Address’ section simply use the ‘Address Code’ dropdown menu to locate the appropriate shipping address and then click ‘Save’ on the sales documents main toolbar.

If the address isn't present, you will need to create a new address on the customer card.
8. Customer Holds
 Staff need to check customer accounts upfront in order to ensure we’re not dealing with any accounting holds and that the customer is active in the system. Some of the holds or obstacles include, payment holds, credit holds, inactive customers, and new customers that need to be entered into SalesPad. Payment Holds are placed by accounting and indicate a problem with payments or past due account balances. This type of issue must be resolved prior to placing new orders. Please contact your appropriate accounting contact. Credit Holds result from customers over their credit limit. If a customer is already over their credit limit, prior to ordering, you’ll need to contact accounting to work thru the details. New orders will allow for 20% overage, anything beyond that 20% will require accounting intervention to resolve.
Currently only Barb, Donna and Pam can Release holds.
9. How to Release a Hold on an Order
When a hold is added to an invoice accounting staff is notified via email.
 All Holds in SalesPad apply to documents. The document being held will be included in the notification sent to accounting. Sales Monitor will also show you any pending holds in the que DCINVOICE-ON HOLD. You can also look the document up by the customer or sales document ID.
Releasing holds on open invoices can only be done by authorized users. If you are the authorized user locate the appropriate sales document, navigate to the ‘Hold’ tab. Then check the box in the Delete column and click ‘Release’ in the top right corner to release the hold.
